Fixed IP Address Connection with Fiber-Optic Services & FLET’S ADSL
About this page
This page gives you information on the connection settings for Fixed IP Address Option with fiber-optic services and ADSL.
Information on fixed IP address connection for each service are as follows.
- Asahi Net FTTH with FLET'S
- Asahi Net docomo Hikari
- FLET'S Hikari Cross
- FLET'S Hikari Next
- FLET’S ADSL
Connection setup
You can choose how to connect with for your fiber-optic service: IPv4 connection (PPPoE) or IPv4 over IPv6 (IPIP).
Check the connection settings for your subscribed service.
Fiber Optics/FLET’S ADSL IPv4 Connection (PPPoE)
Set up your connection with the ID which you subscribed to Fixed IP Address Option.
After setting up, the IP address assigned to you when you first connect to the internet will be fixed.
- *If you applied for Pre-Allocation of Fixed IP Address, your connection will be established with the pre-allocated IP address.
| Connection user name |
f.Asahi Net ID@atson.net (E.g., f.ab4t-ash@atson.net, f.u1234ab567c@atson.net, f.c1234ab567c@atson.net) |
|---|---|
| Connection password |
Asahi Net password which corresponds to the ID
|
| Authentication |
CHAP (fiber-optic line) PAP (FLET'S ADSL) |
|
DNS (Name) Server addresses |
Automatic
|
How to set up a connection device
How to set up a broadband router and how to set up with OS PPPoE are shown in the setup guide for each connection service.
See the respective page for more details.
If you are preparing a router on your own, please contact the manufacturer for how to operate. Asahi Net is unable to give guidance on such routers.
Fiber Optics IPv4 over IPv6 Connection (IPIP)
Rental router (home gateway)
Before setting up
This page gives you information on how to set up your internet connection using a rental router (home gateway).
The information is based on Windows 11 and Microsoft Edge.
The same settings apply to Macintosh computers and other operating systems (OS).
When setting up, please use the following settings for your browser (e.g., Microsoft Edge, Google Chrome, Mozilla Firefox).
- *Enable the JavaScript setting.
- *Disable the proxy server setting.
-
STEP1
Request to install the app for IPv4 over IPv6 Connection (IPIP)
If you are using a home gateway (rental router), you need to make a request to install the setup app.
Please make a request to install the setup app for IPv4 over IPv6 connection (IPIP) via My Page.https://mypage.asahi-net.or.jp/mypage/apply/ipv6
- *ID and corresponding password are required to login.
The setup app will be installed in about 30 to 60 minutes.
-
STEP2
Open a browser window
Open a browser (Microsoft Edge, Google Chrome, Mozilla Firefox, etc.) window.
Enter the address “192.168.1.1” in the address bar and press Enter.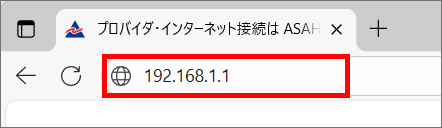
-
STEP3
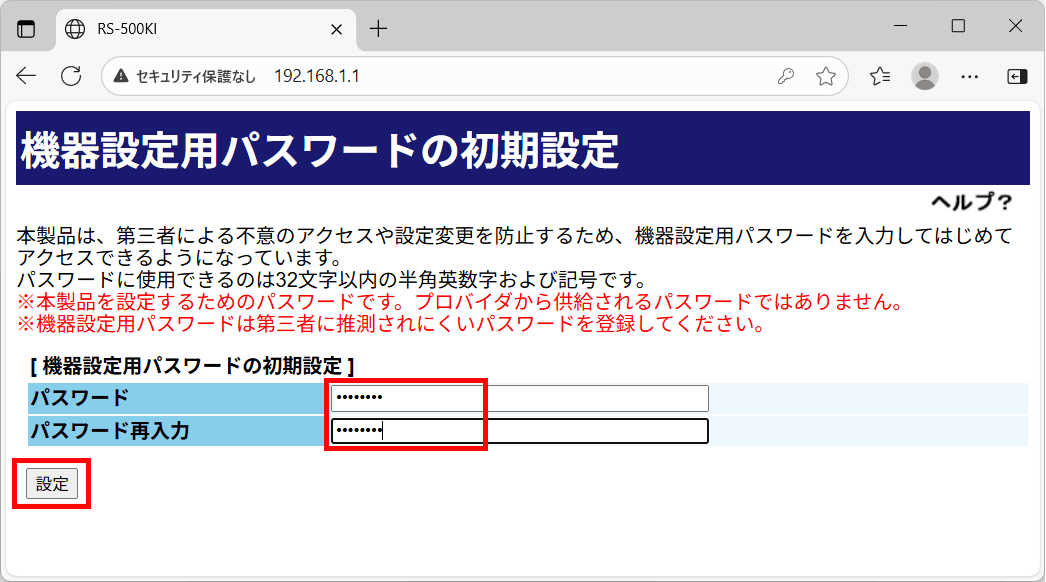
機器設定用パスワードの初期設定 (= Initial setup of device setup password)
機器設定用パスワードの初期設定 (= Initial setup of device setup password*1) will be shown. Decide and enter the password for the rental router (home gateway) and click 設定 (= Set).
- *1Please leave a note of the device setup password after setting up.
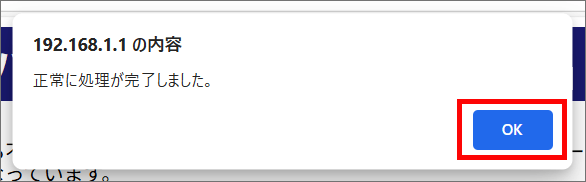
Click OK when the setup complete message is shown.
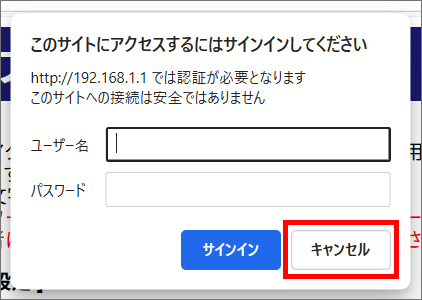
If the login window appears, click キャンセル (= Cancel).
-
STEP4
Open the setup app for IPIP
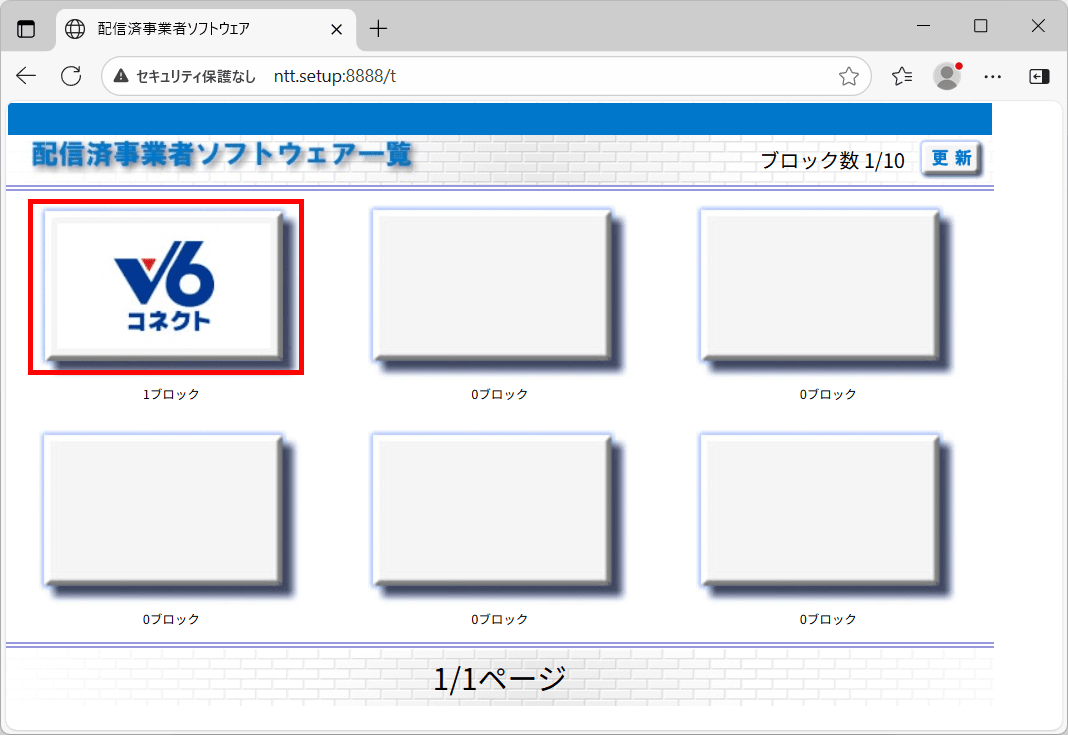
Enter the address “http://ntt.setup:8888/t” or “http://192.168.1.1:8888/t” in the address bar and press the Enter key.
A page with the list of software which provides the setup app will be shown. Click the v6 コネクト (= v6 Connect) icon.
-
If you cannot find the v6 Connect icon in the list of software which provides the setup app, the setup app for IPIP has not yet been installed.
If the installation of the setup app for IPIP does not complete an hour after you made your request, reboot the home gateway and wait for about 15 minutes.
If the situation does not improve, please make a request again to install the setup app for IPIP via the following page.https://mypage.asahi-net.or.jp/mypage/apply/ipv6
- *ID and corresponding password are required to login.
The login page will be shown. Enter the information as shown below and click OK.
ユーザー名 (= Username) user パスワード (= Password) the device setup password you decided 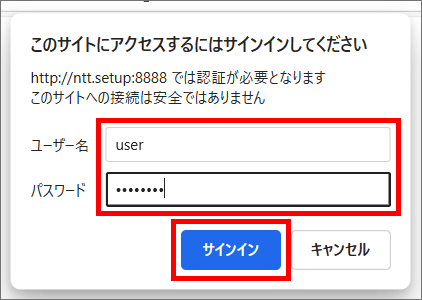
-
-
STEP5
IPIP動作設定(= IPIP operation settings)
The IPIP動作設定 (= IPIP operation settings) page will be shown.
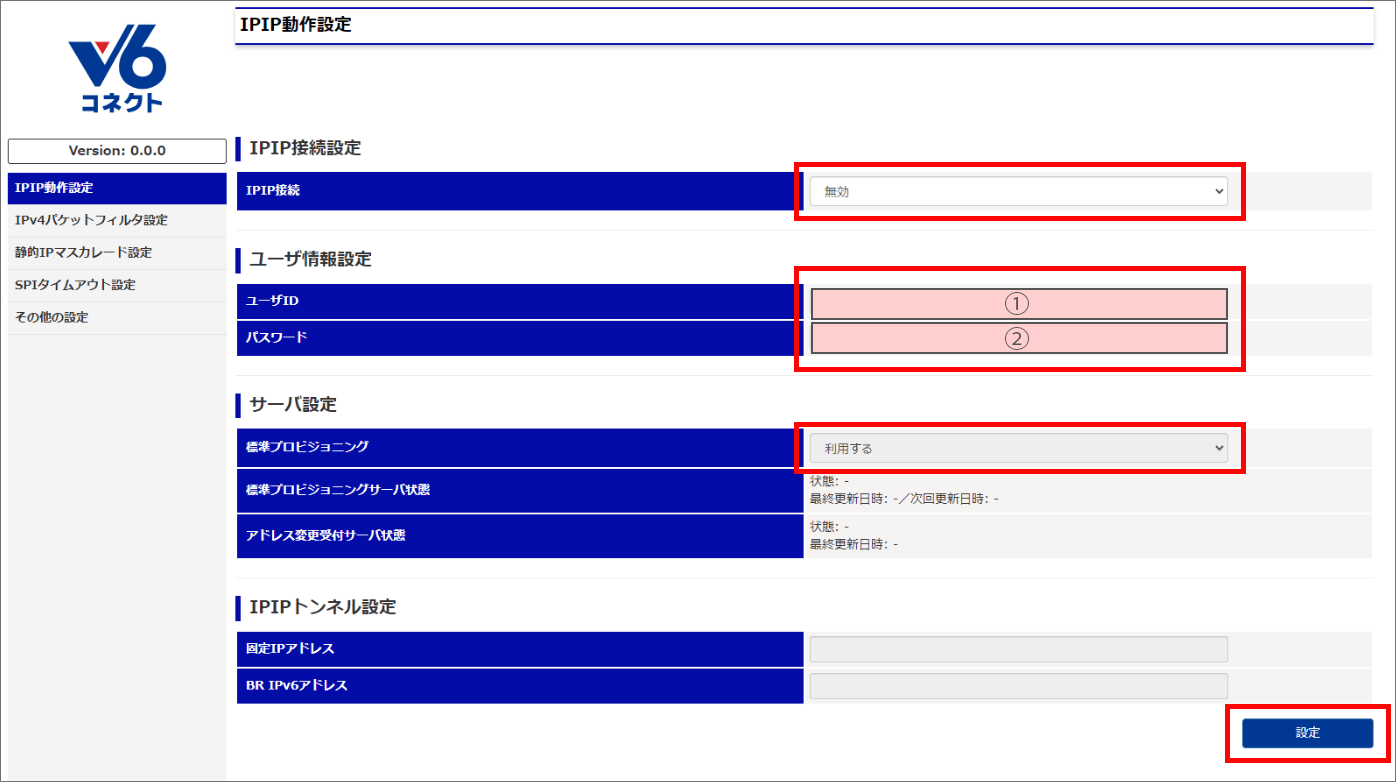
Refer to the following table to set up, and click 設定 (= Set).
For ユーザID (= User ID) and パスワード (= password), enter the Automatic setting retrieval ID and Automatic setting retrieval password shown on My Page.
https://mypage.asahi-net.or.jp/mypage/apply/ipv6
- *After you log in, click Check setting information for IPIP.
Settings
Item 1 Item 2 Settings IPIP接続設定 (= IPIP connection setting) IPIP接続 (= IPIP connection) 有効 (= Enabled) ユーザ情報設定 (= User information settings) ユーザID (= User ID) Enter Automatic setting retrieval ID
E.g., P12345678パスワード (= Password) Enter Automatic setting retrieval password
E.g., ABCDEFGHサーバ設定 (= Server settings) 標準プロビジョニング (= Standard provisioning) 利用する (= Apply) - *The number of digits for this setting information differ by member.
- * ユーザID (= User ID) may contain symbols (.,:+-_@).
-
STEP6
Check connection
Setup is complete when the setup completion message appears at the top of the page.
If setup fails, the message 設定に失敗しました。 (= Setup has failed.) will be shown. Please check your entered information.
How to check for IPv6 connection
You can check your connection status on the IPv6 Connection Status page.
Access the following page using the line which you are connected to the internet with IPv4 over IPv6 Connection (IPIP).
Router prepared by yourself
Settings for IPv4 over IPv6 Connection (IPIP) with Fixed IP Address Option differ by member. You can check your setup information on My Page.
Once your setup information is issued, Asahi Net will inform you by email. See the setup information on your My Page via the email.
Setup items are as follows.
Automatic settings
| Item | Examples of setup information |
|---|---|
| Automatic setting retrieval ID | E.g., P12345678 |
| Automatic setting retrieval password | E.g., ABCDEFGH |
- *The number of digits differ by member.
- *Automatic retrieval setting ID may contain symbols (.,:+-_@).
-
*These settings are for routers which support automatic settings. See the following page for supported routers.
IPv4 over IPv6 Connection (IPIP) Supported Routers
Manual settings
| Item | Examples of setup information |
|---|---|
| Interface ID | Issued in IPv6 address format Format: xxxx:xxxx:xxxx:xxxx:xxxx:xxxx:xxxx:xxxx |
| AFTR endpoint IPv6 address | Issued in IPv6 address format Format: xxxx:xxxx:xxxx:xxxx:xxxx:xxxx:xxxx:xxxx |
| Fixed IPv4 address | Issued in IPv4 address format Format: xxx.xxx.xxx.xxx |
| Update server URL | https://v6update.asahi-net.or.jp/prefix |
| Authentication user ID | E.g., P12345678 |
| Authentication password | E.g., ABCDEFGH |
- *The number of digits differ by member.
- *Authentication user ID may contain symbols (.,:+-_@).
How to set up a connection device
Contact the manufacturer for how to operate a IPv4 over IPv6 Connection (IPIP) supported router.
If you wish to check your connection status in the manual of your router, or if you wish to see setup examples, see under the section v6 Connect.
- *Asahi Net’s IPv6 connection uses the v6 Connect by Asahi Net, Inc.
How to check for IPv6 connection
You can check your connection status on the IPv6 Connection Status page.
Access the following page using the line which you are connected to the internet with IPv4 over IPv6 Connection (IPIP).
Precautions
- Asahi Net is blocking Port 53 (Inbound Port 53). See Inbound Port 53 Blocking (IP53B) for more details.