Internet Connection/Phone Function Settings for VoIP Adapter (Router Mode)
About this page
This page gives you information on how to set up the VoIP adapter (router modem) for using an IP-Phone.
Internet connection setup
-
STEP1
Open a browser window
Open a browser window.
Enter the address “http://192.168.100.1” in the address bar and press Enter.
-
STEP2
Login
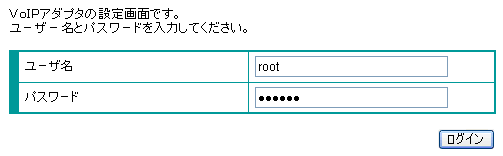
Enter the information to log into the VoIP adapter*1 in the dialog window shown and click OK.
- *1 Factory default: ユーザー名 (= user name) is root, パスワード (= password) is wakeup. Please note that they are NOT Asahi Net ID and password.
-
STEP3
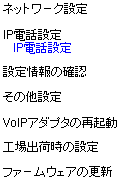
ネットワーク設定 (= Network settings)
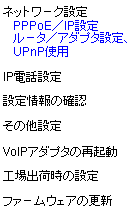
In the left menu, click ネットワーク (= Network), and then click ルータ/アダプタ設定、UPnP使用 (= Router/Adapter settings and use of UPnP).
-
STEP4
ネットワーク → ルータ/アダプタ設定、UPnP使用
ルータ/アダプタ設定、UPnP使用 (= Router/Adapter settings and use of UPnP)Set up as follows. Set the other fields on your preferences depending on your environment and then click the 設定変更 (= Change settings) button.
ルータ/アダプタ選択
Router or adapterChoose ルータ (= Router) 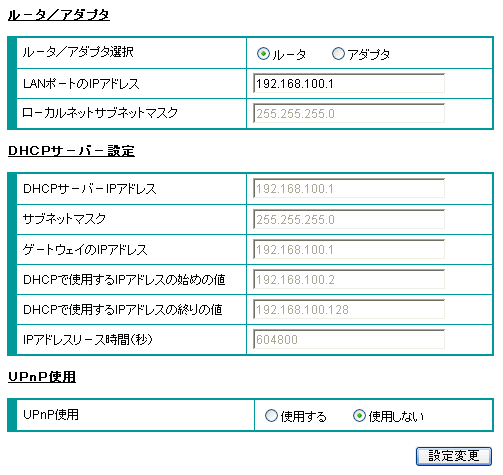
-
STEP5
ネットワーク設定 (= Network settings)
In the left menu, click ネットワーク (= Network), and then click PPPoE/IP設定 (= PPPoE/IP settings).

-
STEP6
PPPoE/IP設定 (= PPPoE/IE settings)
Set up as follows and click the 設定変更 (= Change settings) button.
接続種別
Connection typeChoose PPPoE ユーザ名
User nameAsahi Net ID@atson.net
(E.g., ab4t-ash@atson.net)パスワード
PasswordAsahi Net password which corresponds to the ID IP種別
IP typeChoose ダイナミック (= Dynamic) DNSサーバのIPアドレスの取得方法
How DNS server retrieves IP addressChoose 自動取得 (= Auto) or アダプタ (= Adapter) 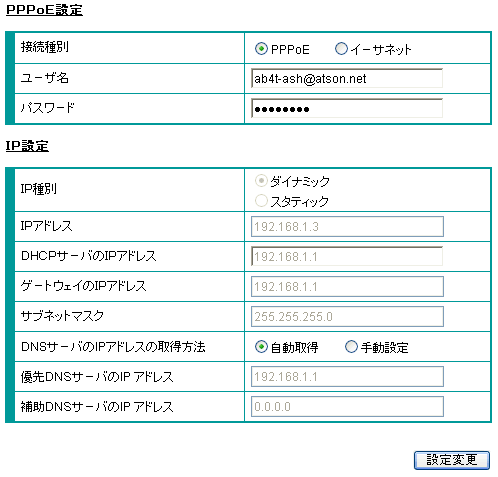
Phone function settings
-
STEP1
IP電話設定 (= IP-Phone settings)
In the left menu, click IP電話設定 (= IP-Phone settings).
-
STEP2
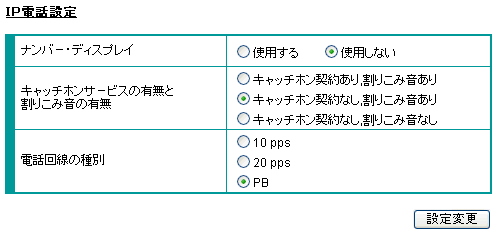
IP電話設定 (= IP-Phone settings)
Set up as follows and click the 設定変更 (= Change settings) button.
ナンバー・ディスプレイ
Caller ID DisplayIf you are using a Caller ID Display supported phone device, 使用する (= Use)
If you are using a phone device not supporting caller ID display, 使用しない(= Not use)キャッチホンサービスの有無と割り込み音の有無
Use of call waiting & call waiting soundOn your preference (based on your environment) Type of phone line Choose based on the dial type of your phone line*2 - *2 Check the contract details of your subscribed line to set up. You also have to align your dial type of your phone device to the subscribed line.
Check settings
And finally, if the lamp status is as follows, the internet connection setup is complete.
After connecting to the internet, set up the phone function.
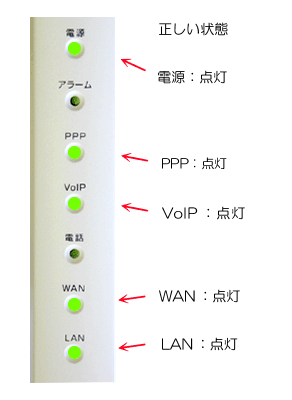
Correct status
| 電源 (= Power) | Green light is on |
|---|---|
| PPP | Green light is on |
| VoIP | Green light is on |
| WAN | Green light is on |
| LAN | Green light is on |