FLET'S Hikari Cross | docomo Hikari 10 Gbps
This page gives Asahi Net members information on how to make application/change their subscription service, and various request procedures including how to check contract details.
- FLET'S Hikari Cross
- docomo Hikari 10 Gbps
- Asahi Net FTTH with FLET‘S East Japan Cross Course
Steps to Start Using
Before applying, please check if your area is applicable.
-
STEP1
Apply
How to apply depends on the service you are subscribing. See the respective service page for more details.
-
STEP2
Asahi Net will send you the contract details via postal mail
After your application is accepted, Asahi Net will send you two notifications:
- Notification Regarding Your ID/Password
(this only applies to new Asahi Net Members) - Notification Regarding the Contract Details
Please store the two documents in a safe place after you confirm the details.
If you applied for docomo Hikari 10 Gbps, NTT docomo will send you a Notification Regarding Line Construction before the construction date.
- Notification Regarding Your ID/Password
-
STEP3
Fiber-optics line construction
The line construction will be carried out.
You will need to be present during the construction.Depending on the location and the building you live in, extra time may be required until the day of construction.
-
STEP4
Installation of 10 Gbps supporting router
Please turn ON the switch of 10 Gbps supporting router and connect to ONU before the service start date.
-
STEP5
Delivery of connection settings information
On the service start date, the connection settings information will be delivered automatically.
Once the delivery of connection settings information is completed, you can immediately start using the service.
-
STEP6
Start using the service
Device Configuration
The following diagram shows how to connect devices for FLET'S Hikari Cross/docomo Hikari 10 Gbps.
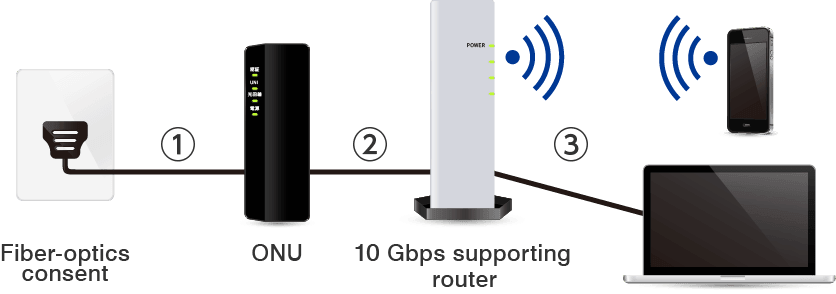
- 1.Connect ONU to fiber-optics consent with fiber-optics cable. The line construction personnel will do these installation works for you together with the line construction.
- 2.Connect ONU and 10 Gbps supporting router to WAN 10G with the included LAN cable, and switch ON the router.
- 3.Connect your device (computer, smartphone, etc.) to 10 Gbps supporting router with LAN or wireless LAN (Wi-Fi).
Precautions
- If your LAN cable, computer, or smartphone is not supporting 10 Gbps, the supporting speed for each device/cable will be the maximum communication speed.
- LAN cable for computer is not included in the service. If you are connecting computer to the 10 Gbps supporting router, a LAN cable (category 6 and above; should be prepared separately by the user) is required.
- Not all 10 Gbps supported routers may have 10 Gbps supported port. Please be aware of it when connecting a device (such as computer) to the router. In case of rental router (XG-100NE/XG-200KI), the port which supports 10 Gbps is only the LAN4 port.