Internet Connection Settings for Web Caster 3000MV
Internet connection setup
Before setting up
This page gives you information on how set up the internet with Web Caster 3000MV.
The information is based on Web Caster 3000MV (firmware version: 01.03), and Windows XP, Internet Explorer (for Windows).
The same settings apply to Macintosh computers and other OSs
How to set up
-
STEP1
Open a browser window
Open a browser window.
Enter the address “http://192.168.1.1” in the address bar and press Enter.
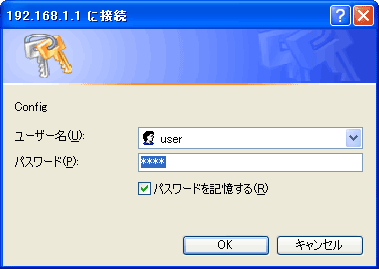
Enter the information to log into the modem in the dialog window shown and click OK.
ユーザー名
User nameuser パスワード
Passworduser (factory default) 
-
STEP2
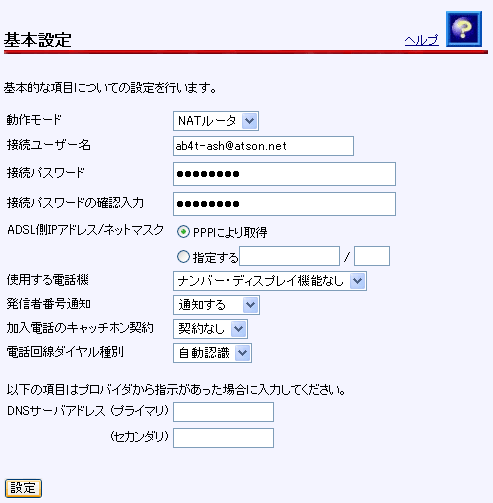
基本設定 (= Basic settings)
Set up as follows and click the 設定 (= Set) button.
動作モード
Operating modeNATルータ
NAT router接続ユーザー名
Connection user nameASAHIネットID@atson.net
(E.g., ab4t-ash@atson.net)接続パスワード
Connection passwordAsahi Net password which corresponds to the ID 接続パスワードの確認入力
Confirm connection passwordEnter again the Asahi Net password which corresponds to the ID ADSL側IPアドレス/ネットマスク
ADSL IP address/Net maskSelect PPPにより取得 (= Retrieve through PPP) 使用する電話機
Your phone deviceIf you are using a caller ID display-supported phone device, あり (= Yes)
If you are using a phone device not supporting caller ID display, なし (= None)発信者番号通知
(IP発信時の設定)
Caller number notification
(settings for when IP is sent)If you wish to notify your IP-Phone number (number starting with 050) when dialing in regular manner, select 通知する (= Notify)
If you wish not to notify your IP-Phone number (number starting with 050) when dialing in regular manner, select 通知しない (= Don’t notify)加入電話のキャッチホン契約
Subscription for call waiting serviceIf you are subscribed to a call waiting service, select 契約あり (= Subscribed to)
If you are not subscribed to a call waiting service, select 契約なし (= Not subscribed to)電話回線ダイヤル種別
Dial type of phone lineSet the dial type of your subscribed phone line
If not identified by selecting 自動認識 (= Auto identification), select 手動(PB・DP20pps・DP10pps) (= Manual (PB/DP20pps/10pps))DNSサーバアドレス
DNS server addressLeave it blank
Note: Enter the following information only if you cannot view a webpage after connecting to the internet.
Primary: 202.224.32.1
Secondary: 202.224.32.2
-
STEP3
再起動 (= Reboot)
The page will be switched.
Click 再起動画面へ (= Go to reboot page).
Click the 再起動 (= Reboot) button.

-
STEP4
再表示 (= Page refresh)
After rebooting, click the 再表示 (= Page refresh) button.

-
STEP5
Check connection status
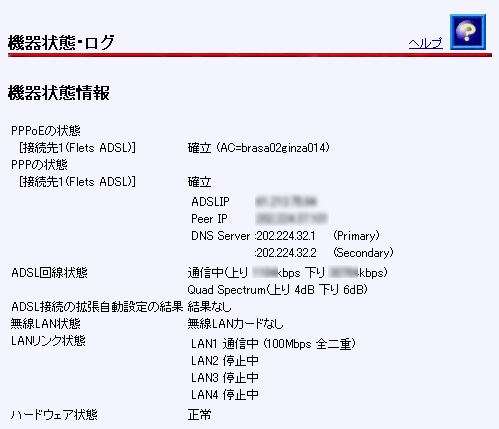
In the left menu under 表示 (= View), click 機器状態・ログ (= Device status/Log).

If 確立 (= Established) is showing under PPPoEの状態 (= PPPoE state), the line is connected and synched.

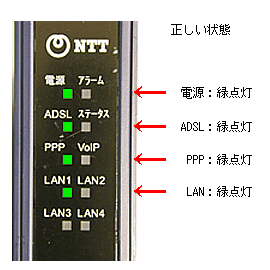
And finally, if the lamp status is as follows, the internet connection setup is complete.
After connecting to the internet, set up the phone function.
Correct status
電源 (= Power) Green light is on ADSL Green light is on PPP Green light is on LAN Green light is on