FFFTP
About this page
This page gives you information on the settings of FFFTP for uploading (transmitting) website data and how to delete files.
The information is based on software version 1.99a-20160911 (64bit).
Check settings
-
STEP1
Start the software
Start FFFTP.

-
STEP2
Create a new host
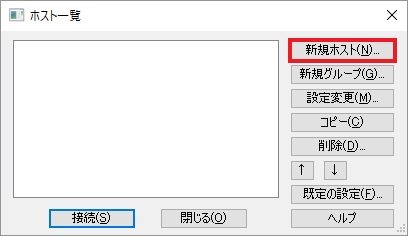
Click 新規ホスト (= New host).
-
STEP3
Host settings: Basic
Set up as follows.
Next, click the 拡張 (= Extension) tab.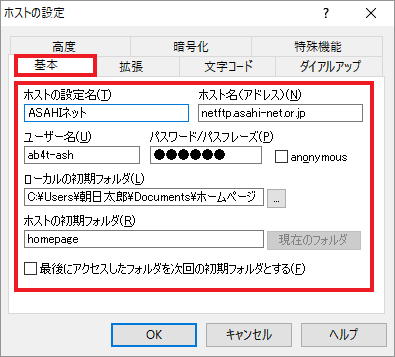
Personal Homepage Service/FreeAddress
ホストの設定名 (= Host name) Any name
(E.g., Asahi Net)ホスト名 (= Host address) netftp.asahi-net.or.jp ユーザー名
User nameIndividual Asahi Net ID
E.g., ab4t-ashパスワード
PasswordAsahi Net password which corresponds to the ID ローカルの初期フォルダ
Initial local folderAny name - *A local folder which you stores the files of your website.
ホストの初期フォルダ
Host’s initial folderPersonal Homepage Service homepage FreeAddress freeaddr/name1/name2 MMJP Web Hosting
ホストの設定名
Host nameAny name
(E.g., Asahi Net)ホスト名
Host addressnetftp.mmjp.or.jp ユーザー名
User nameFTP ID
E.g., F1234AB567Cパスワード
PasswordAsahi Net password which corresponds to the ID ローカルの初期フォルダ
Initial local folderAny name - *A local folder which you stores the files of your website.
ホストの初期フォルダ
Host’s initial folderhtdocs Host settings: Extension
Check if a check mark is placed next to PASVモードを使う (= Use PASV mode)”.
Click the 暗号化 (= Encryption) tab.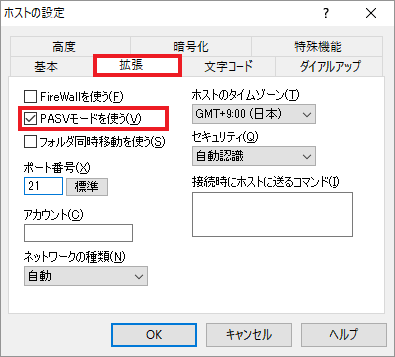
PASVモードを使う
Use PASV modePlace a check mark Host settings: Encryption
Remove the check marks next to FTPS(Explicit)で接続 (= Connect with FTPS (Explicit)) and FTPS(Implicit)で接続 (= Connect with FTPS (Implicit)). Click OK to complete the setup.
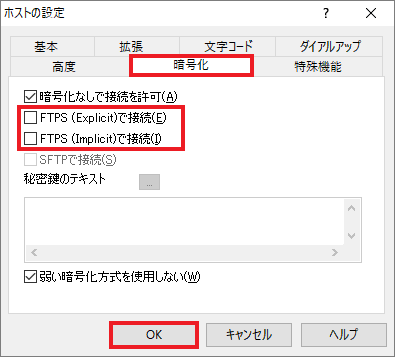
FTPS(Explicit)で接続
Connect with FTPS (Explicit)Remove the check mark FTPS(Implicit)で接続
Connect with FTPS (Implicit)Remove the check mark
How to use
-
STEP1
Connect
By starting FFFTP, a page with a list of hosts will be shown.
Choose your FTP setting and click the 接続 (= Connect) button.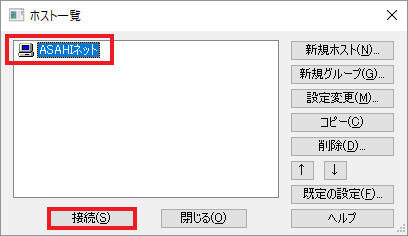
If the 暗号化の状態の保存 (= Save encryption status) window shows up, click はい (= Yes).
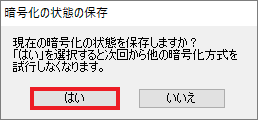
You will be connected to Asahi Net’s website (homepage) server.
The left pane shows the local data (which is stored in your computer), and the right pane shows the data in Asahi Net’s server (remote host).
The data transmitted to the remote host will be shown in the internet.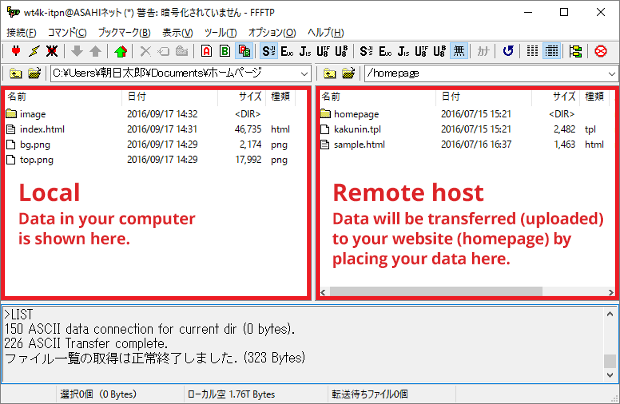
-
STEP2
How to upload files
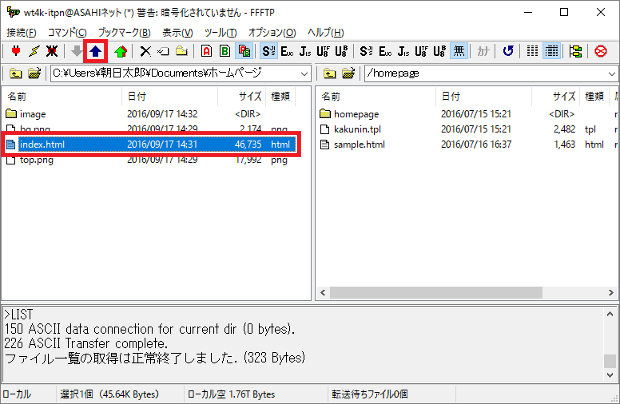
After connecting to the server, choose the files you wish to show on the internet from the list of local data (in the left pane), and transmission (upload) of those files will start by clicking the upload button .
-
STEP3
How to delete files
After connecting to the server, choose the files you wish to delete from the internet from the list of remote host (in the right pane) and click the delete button .
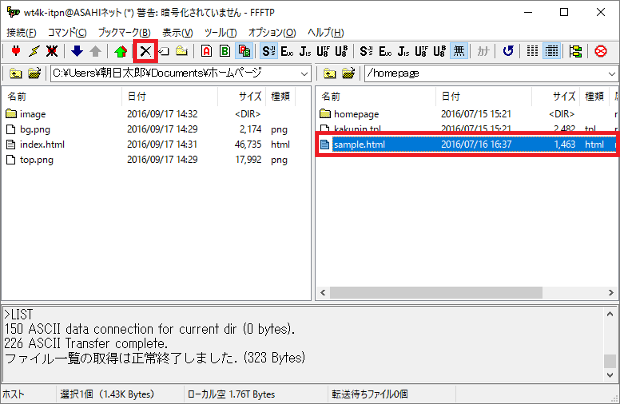
A dialog window will be shown.
Check the file name and click はい (= Yes) if it is OK to delete it.
Please note that deleted files cannot be recovered.。