Mail 10.3 for macOS Sierra Version 10.12 New Settings
- The settings on this page show how to create new settings (add a new email account) on Mail 10.3 (macOS Sierra 10.12).
- The items referred to with [ ] marks in this guide are items unique to each customer.
In actual settings, please replace them with your own information. - Settings for IMAP function could be found in the following page.
Mailer Setup: Before Setting Up
Adding a New Account
-
STEP1
Launching the Software
Launch the Mail application.

-
STEP2
Add Account
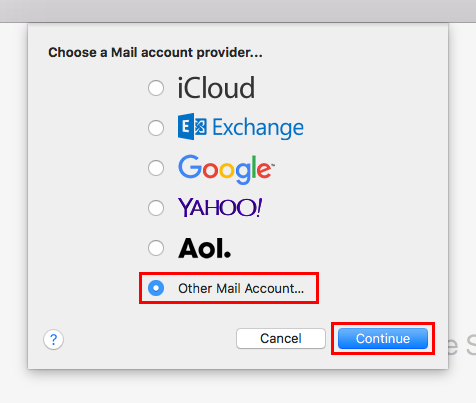
Choose Other Mail Account..., and then click Continue.
- *If the above window does not appear, go to the menu and select Mail, and then select Add Account...
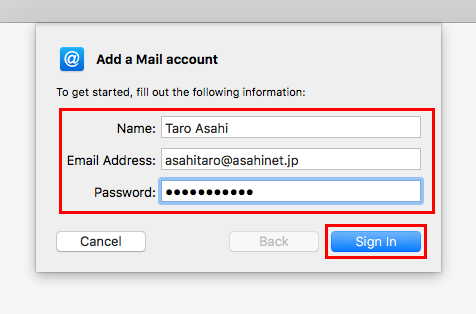
Name [your name]
e.g., Taro AsahiEmail Address [your email address]
e.g., asahitaro@asahinet.jpPassword [Asahi Net password assigned to your Asahi Net User ID] - *Enter in lowercase (small) characters.
Once you have entered all the details, click Sign In.
-
STEP3
Entering Mail Server Information
If "Unable to verify account name or password." appears, manually fill in the sections as shown in the chart above, then click Sign In.
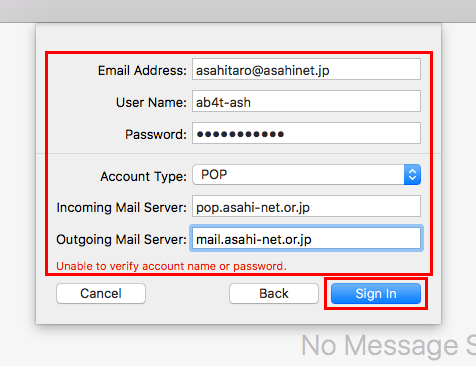
Email Address [your email address]
e.g., asahitaro@asahinet.jpUser Name [your Asahi Net User ID]
e.g., ab4t-ashPassword [Asahi Net password assigned to your Asahi Net User ID] - *Enter in lowercase (small) characters.
Account Type POP Incoming Mail Server pop.asahi-net.or.jp Outgoing Mail Server mail.asahi-net.or.jp
mails.asahi-net.or.jp (*)- *If using the Virus Check service
If entered correctly, the Inbox will appear, and then you can proceed to the next step for configuration.
-
STEP3
Preferences
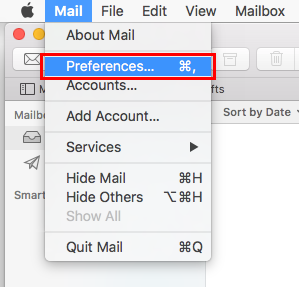
From the menu, select Mail, and then select Preferences...
-
STEP4
Account Information
Select Accounts, and then select Server Settings.
Uncheck Automatically manage connection settings in two places, and fill in each section as shown in the image below.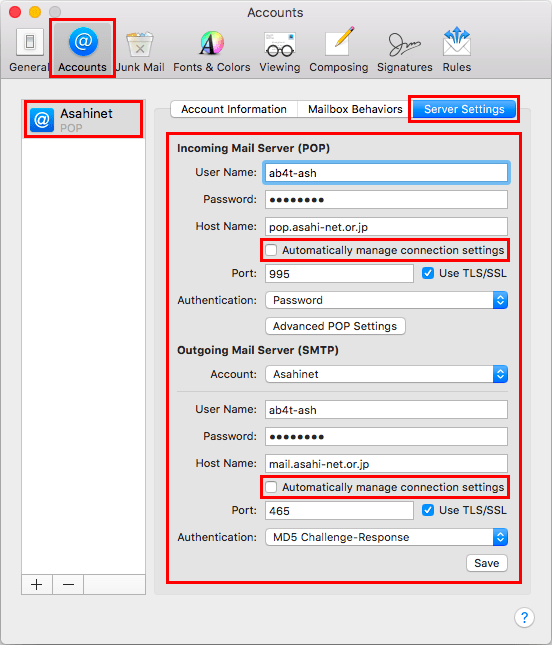
Incoming Mail Server (POP)
User Name [your Asahi Net User ID]
e.g., ab4t-ashPassword [Asahi Net password assigned to your Asahi Net User ID] - *Enter in lowercase (small) characters.
Host Name pop.asahi-net.or.jp Automatically manage connection settings Uncheck Port 995 Use TLS/SSL Check Authentication Password Outgoing Mail Server (SMTP)
Account Asahinet - *This is selected automatically.
User Name [your Asahi Net User ID]
e.g., ab4t-ashPassword [Asahi Net password assigned to your Asahi Net User ID] - *Enter in lowercase (small) characters.
Host Name mail.asahi-net.or.jp Automatically manage connection settings Uncheck Port 465 Use TLS/SSL Check Authentication MD5 Challenge-Response Once you have finished entering the details as above, click the Save button located on the bottom-right of the screen.
The settings are now completed.