Mail 10.3 for macOS Sierra Version 10.12 Confirm Settings
- The settings on this page show how to confirm your settings on Mail 10.3 (macOS Sierra 10.12).
- The items referred to with [ ] marks in this guide are items unique to each customer.
In actual settings, please replace them with your own information. - The [ASAHI Net User ID] used in this guide as an example is [ab4t-ash].
- Settings for IMAP function could be found in the following page.
Mailer Setup: Before Setting Up
Confirm Settings
-
STEP1
Launching the Software
Launch the Mail application.

-
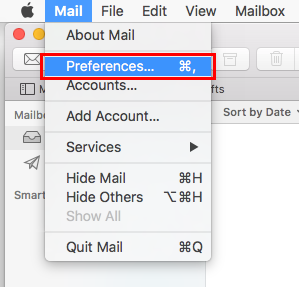
STEP2
Preferences
From the menu, select Mail, and then select Preferences...
-
STEP3
Account Information
Select Accounts and then Server Settings, and fill in each section as shown in the image below.

Incoming Mail Server (POP)
User Name [your Asahi Net User ID]
e.g., ab4t-ashPassword [Asahi Net password assigned to your Asahi Net User ID] - *Enter in lowercase (small) characters.
Host Name pop.asahi-net.or.jp Automatically manage connection settings Uncheck Port 995 Use TLS/SSL Check Authentication Password Outgoing Mail Server (SMTP)
Account Asahinet - *This is selected automatically.
User Name [your Asahi Net User ID]
e.g., ab4t-ashPassword [Asahi Net password assigned to your Asahi Net User ID] - *Enter in lowercase (small) characters.
Host Name mail.asahi-net.or.jp Automatically manage connection settings Uncheck Port 465 Use TLS/SSL Check Authentication MD5 Challenge-Response Once you have finished entering the details as above, click the Save button located on the bottom-right of the screen.
The settings are now completed.